ວິທີການຖອນເງິນແລະເງິນຝາກໃນ ApeX
How to Withdraw on ApeX
How to Withdraw from ApeX (Web)
Click ‘Withdraw’ on the trade screen.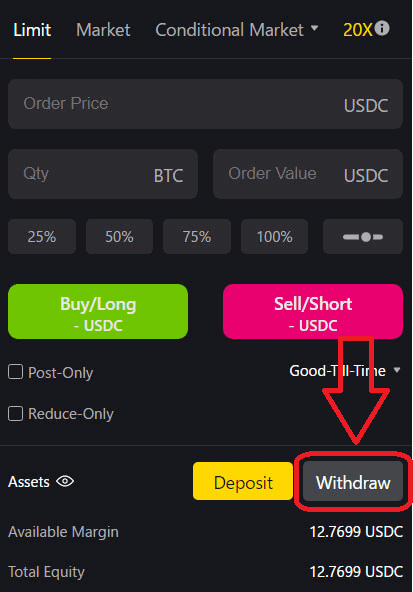
The minimum withdrawal amount for ApeX Pro is USD 10.
- Non-Ethereum withdrawals require verification in L2 (by ZK proof) and may take up to 4 hours to process the withdrawal.
- Sufficient funds must be available in the corresponding chain’s asset pool to process non-Ethernet withdrawals.
- There will also be a gas fee; ApeX Pro will charge a fee to cover this.
Confirm Withdrawal.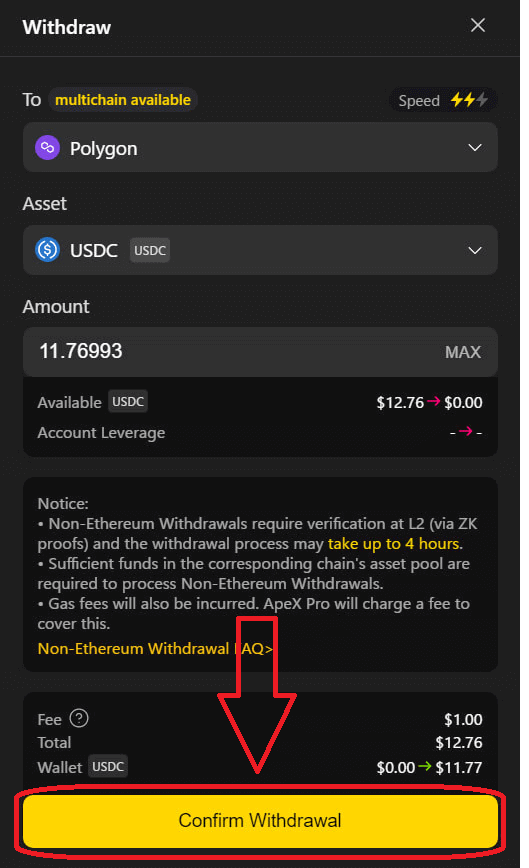

The status of withdrawals can be checked under Dashboard Transfers.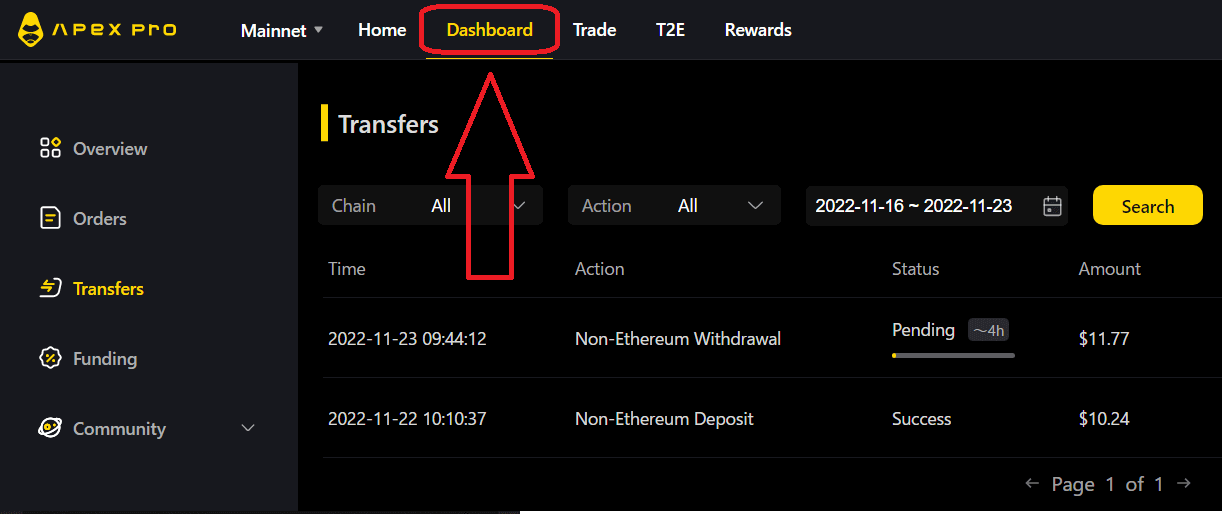
How to Withdraw from ApeX (App)
Click on the [Account]section at the right lower corner of the screen, then click on the ’Withdraw’ button.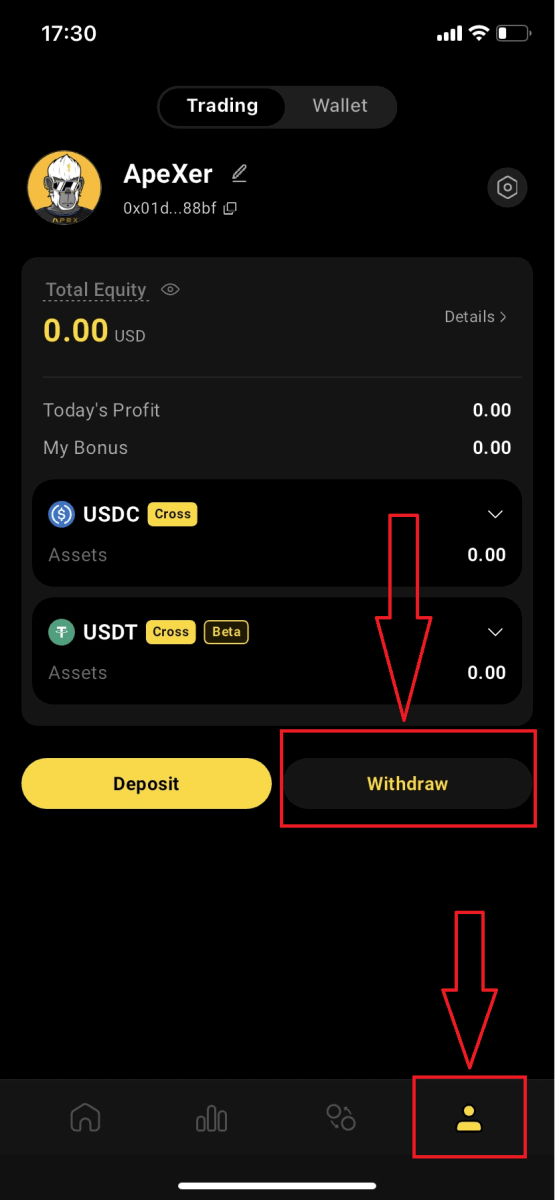
Similar to the desktop platform, the chain, asset, and quantity are optionable before clicking on the ’ Confirm Withdrawal’ button.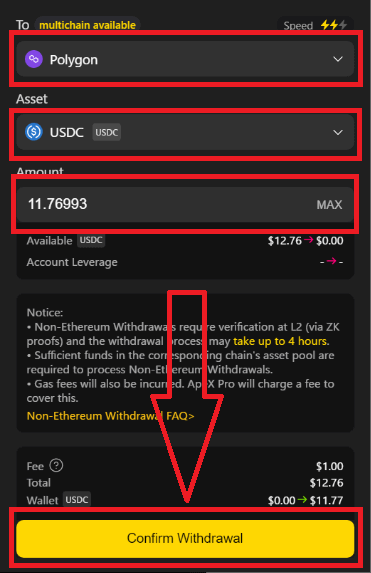
Ethereum Withdrawals
ApeX Pro offers two withdrawal options via the Ethereum network: Ethereum Fast Withdrawals and Ethereum Normal Withdrawals.
Ethereum Fast Withdrawals
Fast withdrawals utilize a withdrawal liquidity provider to send funds immediately and do not require users to wait for a Layer 2 block to be mined. Users do not need to send a Layer 1 transaction to perform a fast withdrawal. Behind the scenes, the withdrawal liquidity provider will immediately send a transaction to Ethereum which, once mined, will send the user their funds. Users must pay a fee to the liquidity provider for fast withdrawals equal to or greater than the gas fee the provider would pay for the transaction and 0.1% of the amount of the withdrawal amount (minimum 5 USDC/USDT). Fast withdrawals are also subject to a maximum size of $50,000.
Ethereum Normal Withdrawals
Normal withdrawals do not use a liquidity provider to speed up the withdrawal process, so users must wait for a Layer 2 block to be mined before they are processed. Layer 2 blocks are mined roughly once every 4 hours, though this could be more or less frequent (up to 8 hours) based on network conditions. Normal withdrawals occur in two steps: the user first requests a normal withdrawal, and once the next Layer 2 block is mined, the user must send a Layer 1 Ethereum transaction to claim their funds.
Non-Ethereum Withdrawals
On ApeX Pro, you have the option to withdraw your assets directly to a different chain. When a user initiates a withdrawal to an EVM-compatible chain, the assets undergo an initial transfer to ApeX Pro’s Layer 2 (L2) asset pool. Subsequently, ApeX Pro facilitates the transfer of the equivalent asset amount from its own asset pool to the user’s designated address on the corresponding withdrawal chain.
It’s important to be aware that the maximum withdrawal amount is determined not only by the total assets in a user’s account but also by the maximum available amount in the asset pool of the target chain. Ensure that your withdrawal amount adheres to both limitations for a seamless transaction experience.
Example:
Imagine Alice has 10,000 USDC in her ApeX Pro account. She wants to take out 10,000 USDC using the Polygon chain, but the Polygon’s asset pool on ApeX Pro only has 8,000 USDC. The system will let Alice know that the available funds on the Polygon chain are not enough. It will suggest she either withdraws 8,000 USDC or less from Polygon and takes out the rest through another chain, or she can withdraw the full 10,000 USDC from a different chain with enough funds.
Traders can easily and safely make deposits and withdrawals using their preferred chain on ApeX Pro.
ApeX Pro will also use a monitoring program to adjust the balance of funds across chains to ensure sufficient assets in varying asset pools at any one time.
How to Deposit on ApeX
How to Deposit on ApeX (Web)
1.First, go to the[ApeX] website, then log in to your [ApeX] account. Make sure that you have already connected your wallet to [ApeX].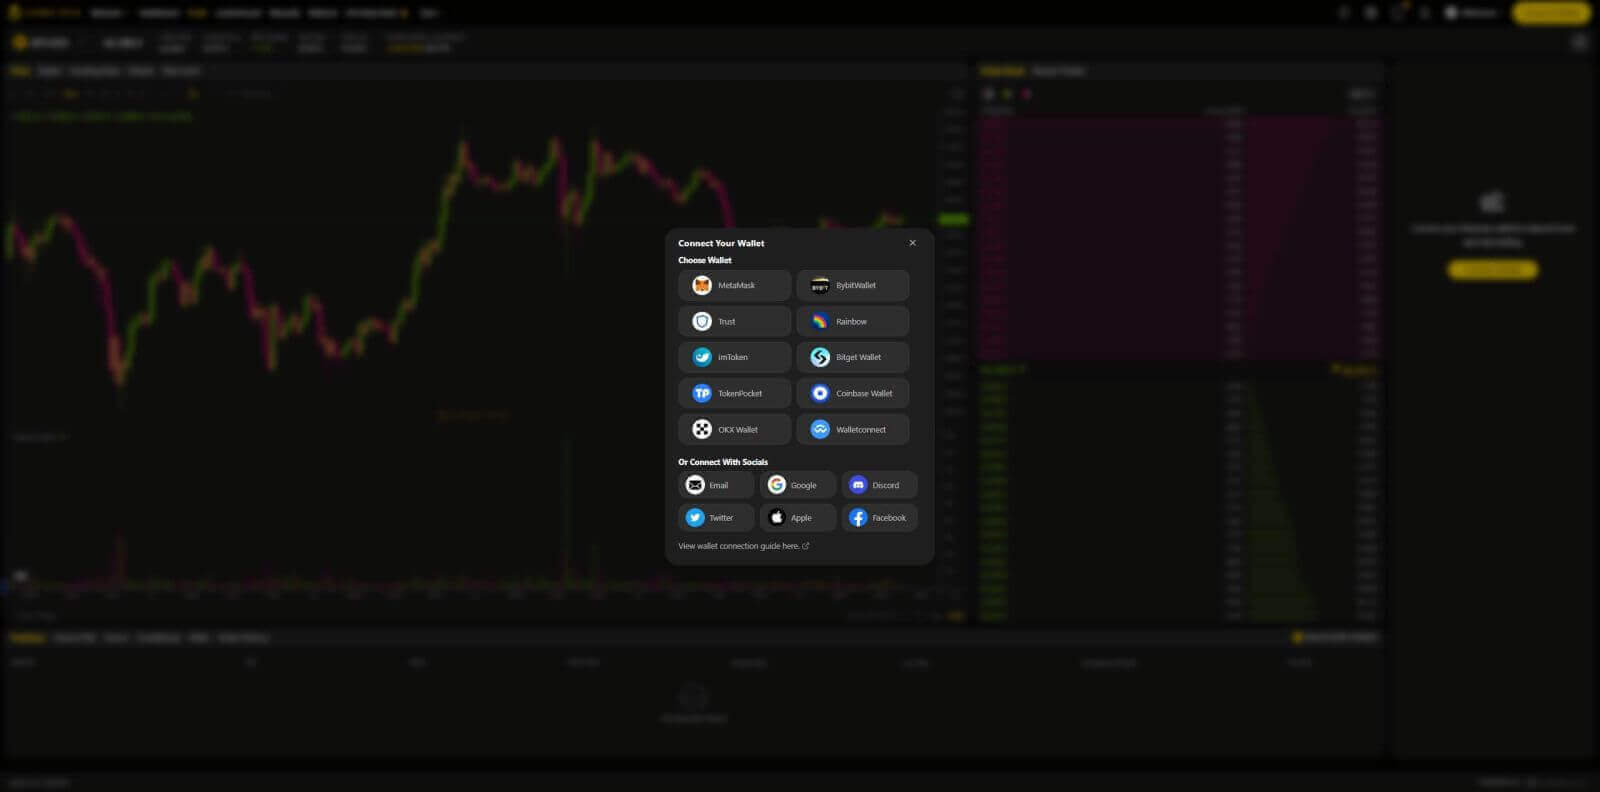
2.Click on [Deposit] in the top right corner of the page.

3.Select the network where you have funds available to deposit, such as Ethereum, Binance Smart Chain, Polygon, or Arbitrum One.
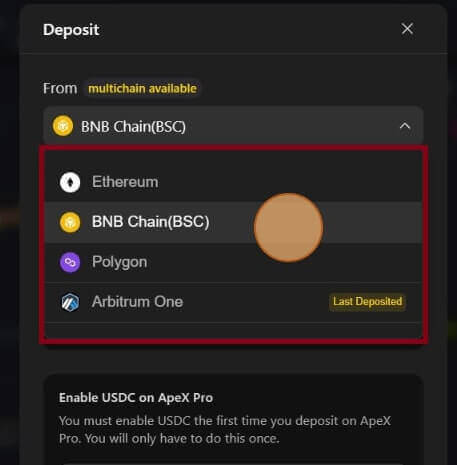
* Note:If you are not currently on the selected network, a Metamask prompt will appear asking for permission to switch to the selected network. Please approve the request to continue.
4. Select the asset you want to deposit, choose among of:
- USDC
- BNB
- USDT
- BUSD
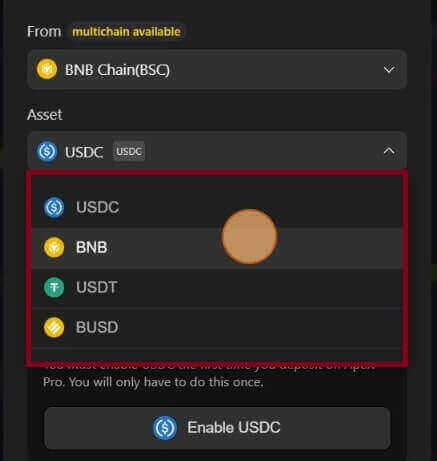
5. Please enable the selected asset to deposit. This actionwill cost a gas fee, so make sure you have a small amount available to sign the contract on the chosen network.
The gas fee will be paid in ETH for Ethereum and Arbitrum, Matic for Polygon, and BNB for BSC.
How to Deposit on ApeX (App)
1. Click on the profile icon in the bottom right corner.
2. Choose the [Deposit] button.

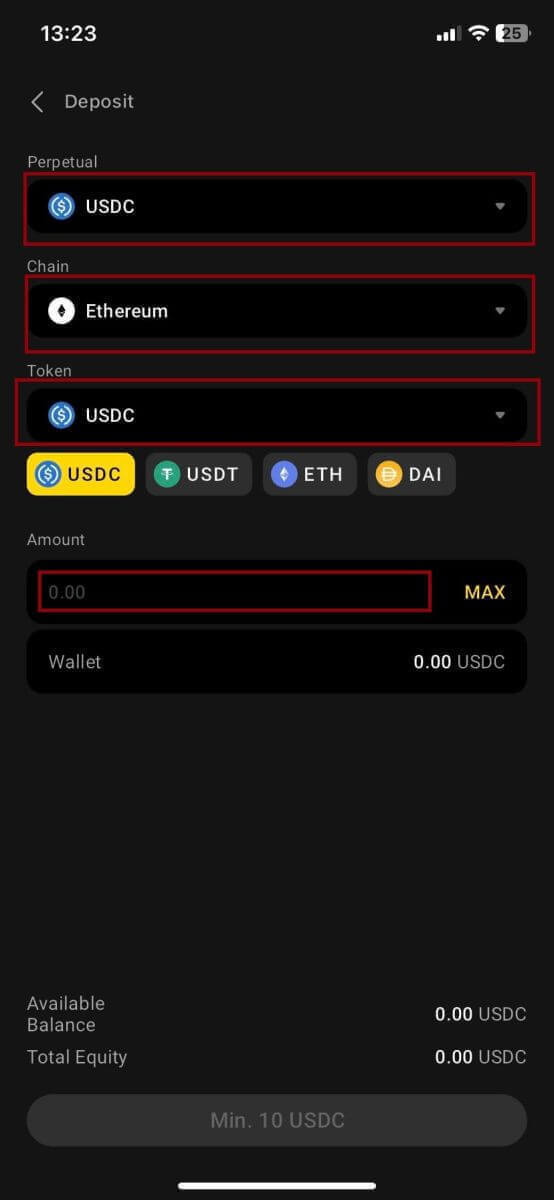
3. Here, choose the Perpetual you want to deposit, the Chain, and the Token you want to, each Token will present with the deposit ratio. Type in the amount in the box below too. After choosing all information click [Confirm] to start depositing.
How to Deposit on ApeX with MPC Wallet
1. Select your preferred social login methods under the new [Connect With Social]feature.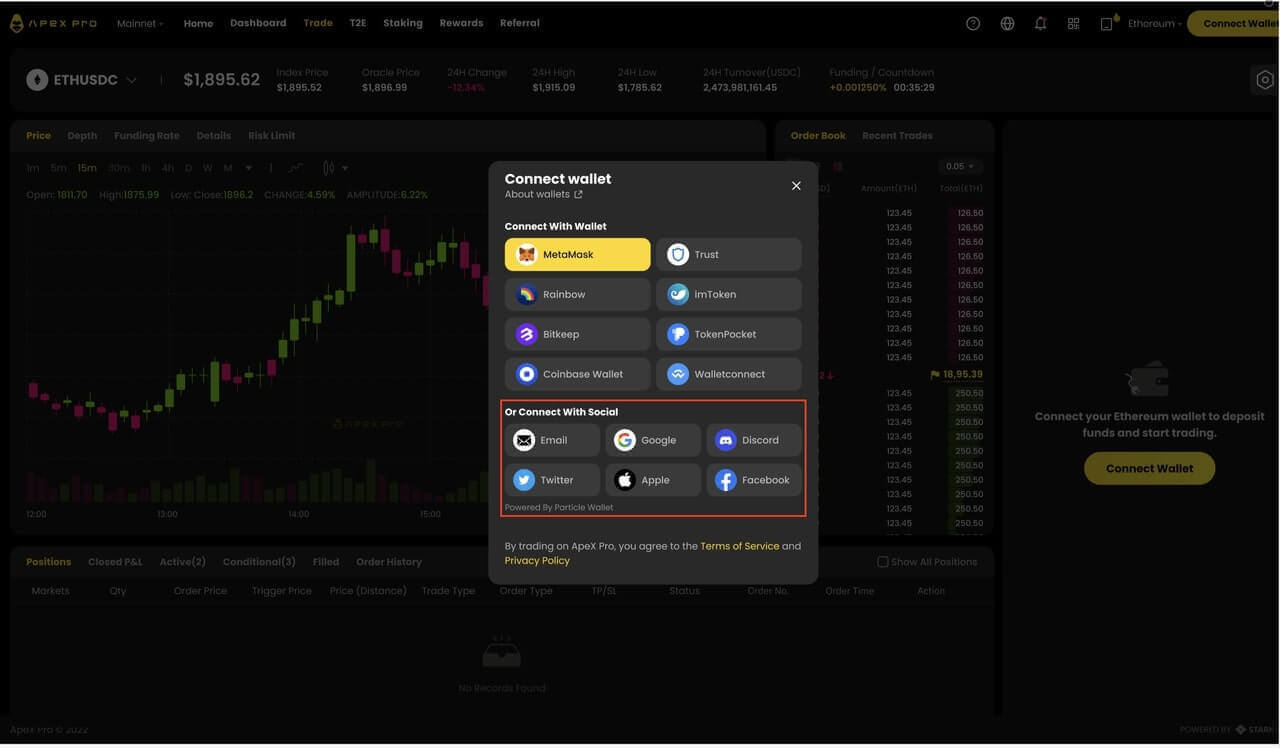
2. Receive deposited funds or make a transfer from your account.
- Desktop: Click on your wallet address in the upper-right corner of the page.
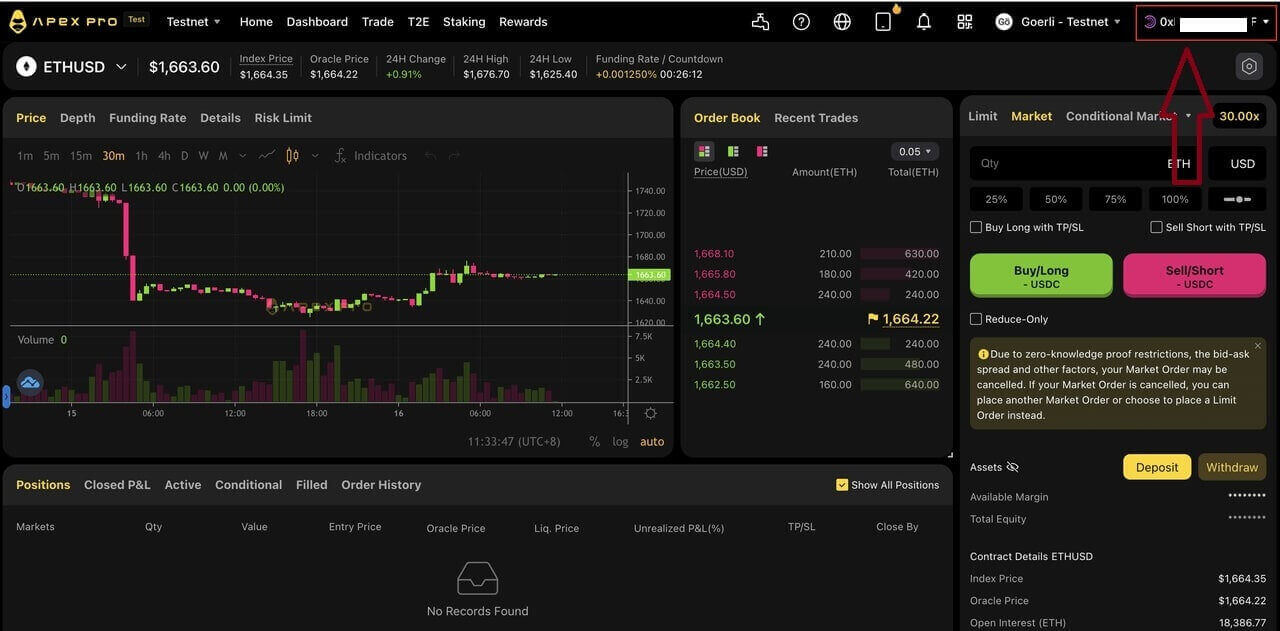
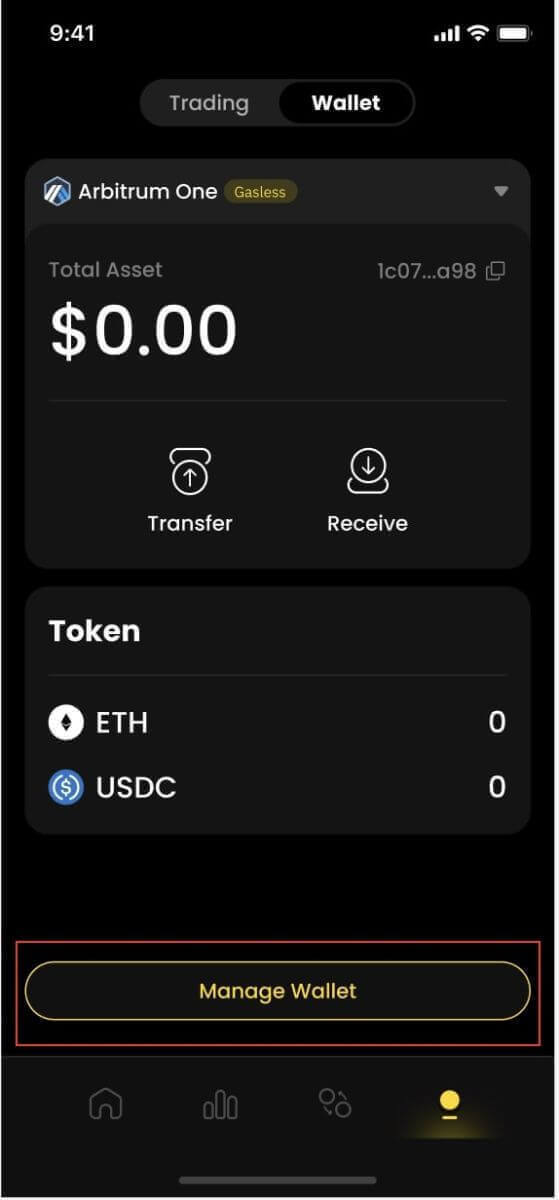
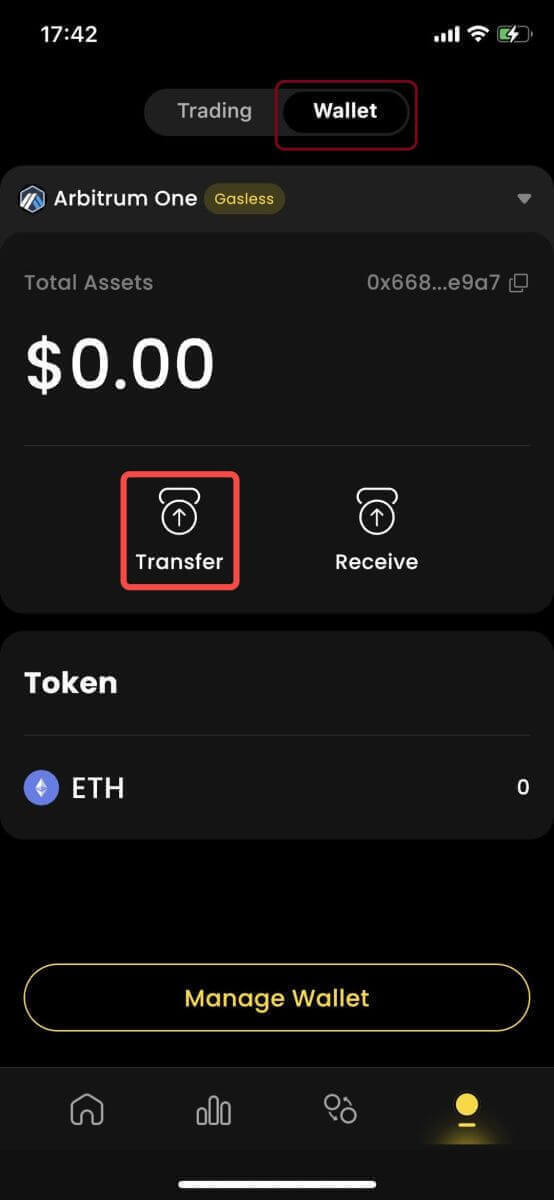
- App: Tap on the right-most icon to access your profile, and then click on the [Wallet] tab.
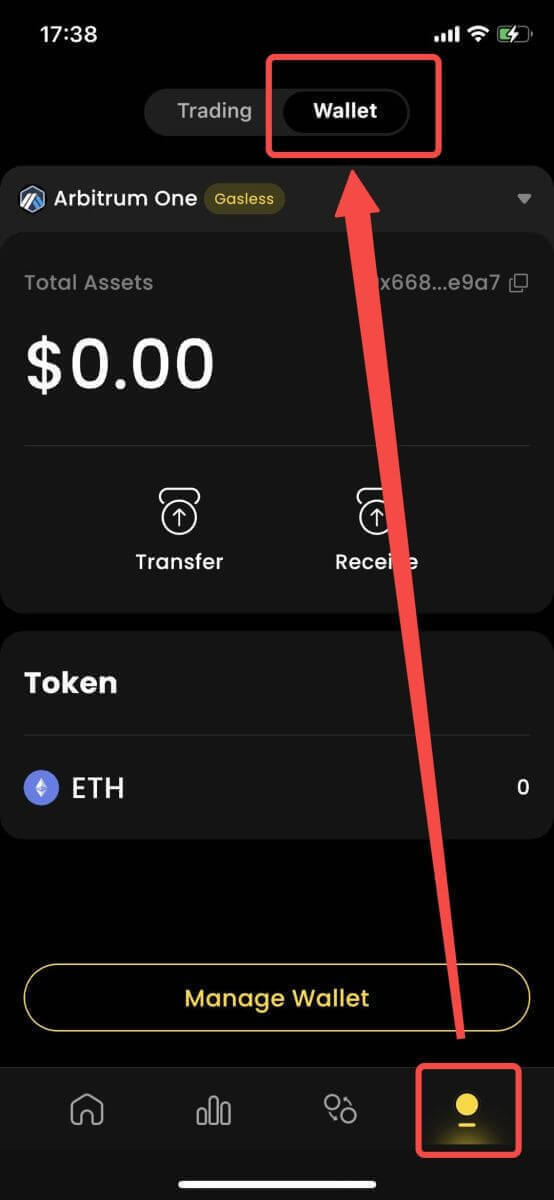
3. Next is what deposits look like on theDesktop and App
- Desktop: Click on [Receive]and copy the provided wallet address, or scan the QR code from another wallet application (you can choose to scan with your in-centralized exchange wallet or other similar wallet applications) to make a deposit into Particle Wallet. Please take note of the selected chain for this action.

- App: This is what the same process looks like on the app.

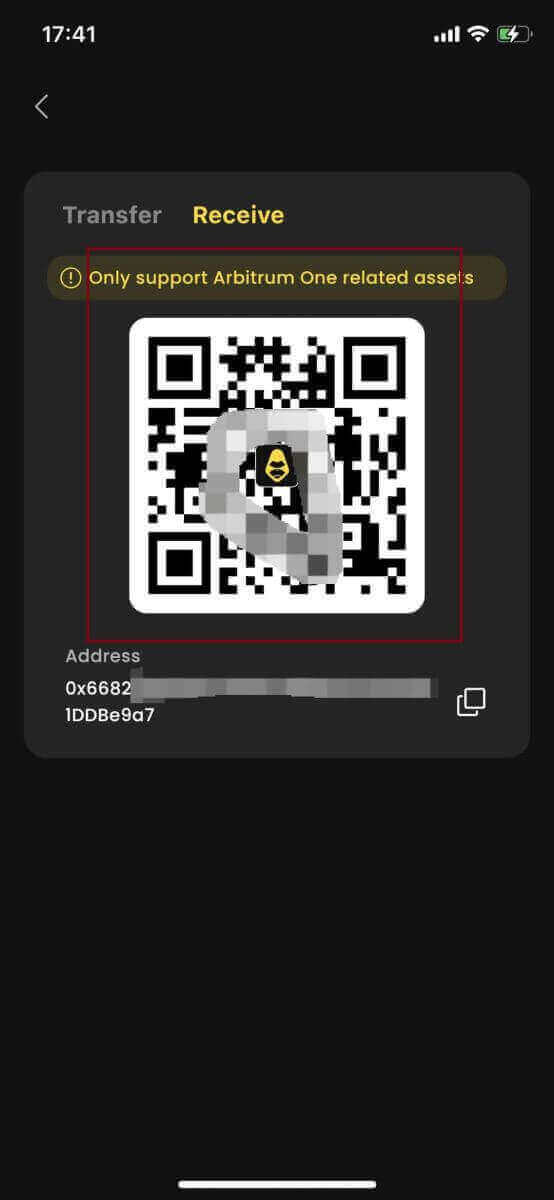
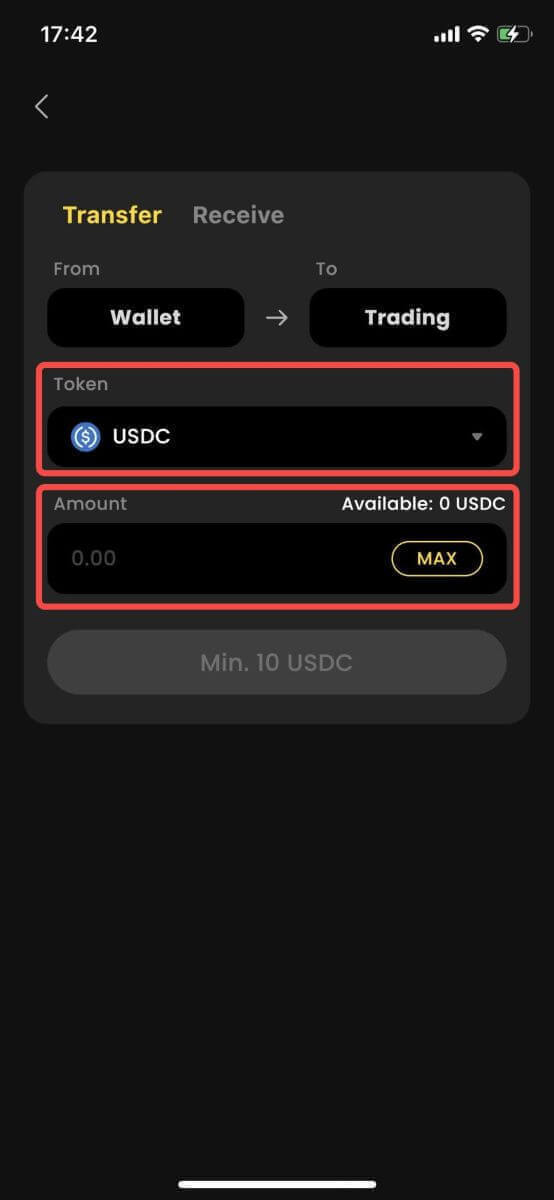
4. If you want to transfer to your trading account in [ApeX], here is what it looks like:
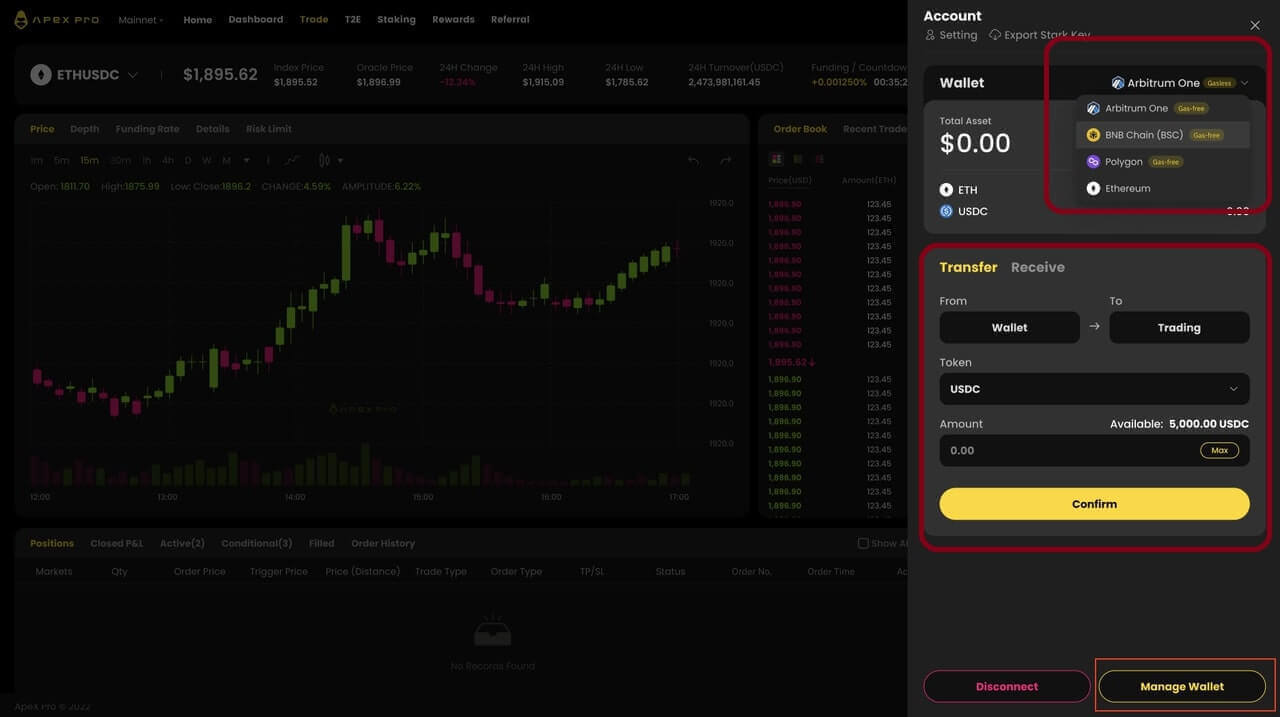
- Desktop: Click on the [Transfer]tab and enter your desired amount of funds for transfer. Please ensure that the amount entered is greater than 10 USDC. Click on [Confirm].

- App: This is what the same process looks like on the app.
How to Manage MPC Wallet on ApeX
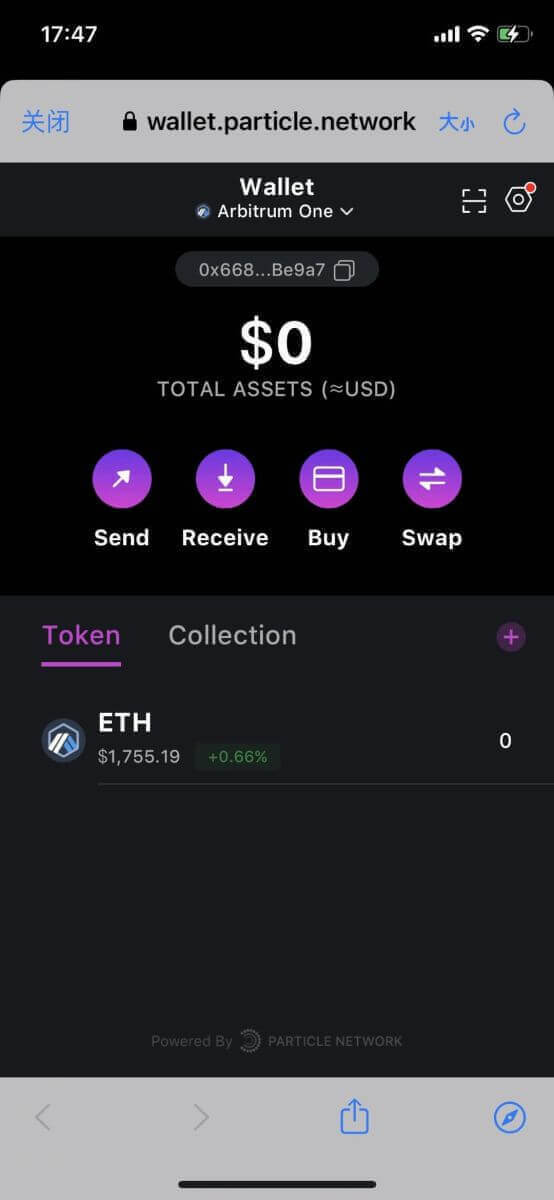
1. Manage wallet on Desktop:- Desktop: Click on Manage Wallet to access your Particle Wallet. You can access the full functionality of the Particle Wallet, including sending, receiving, swapping, purchasing tokens with fiat, or viewing more wallet settings.
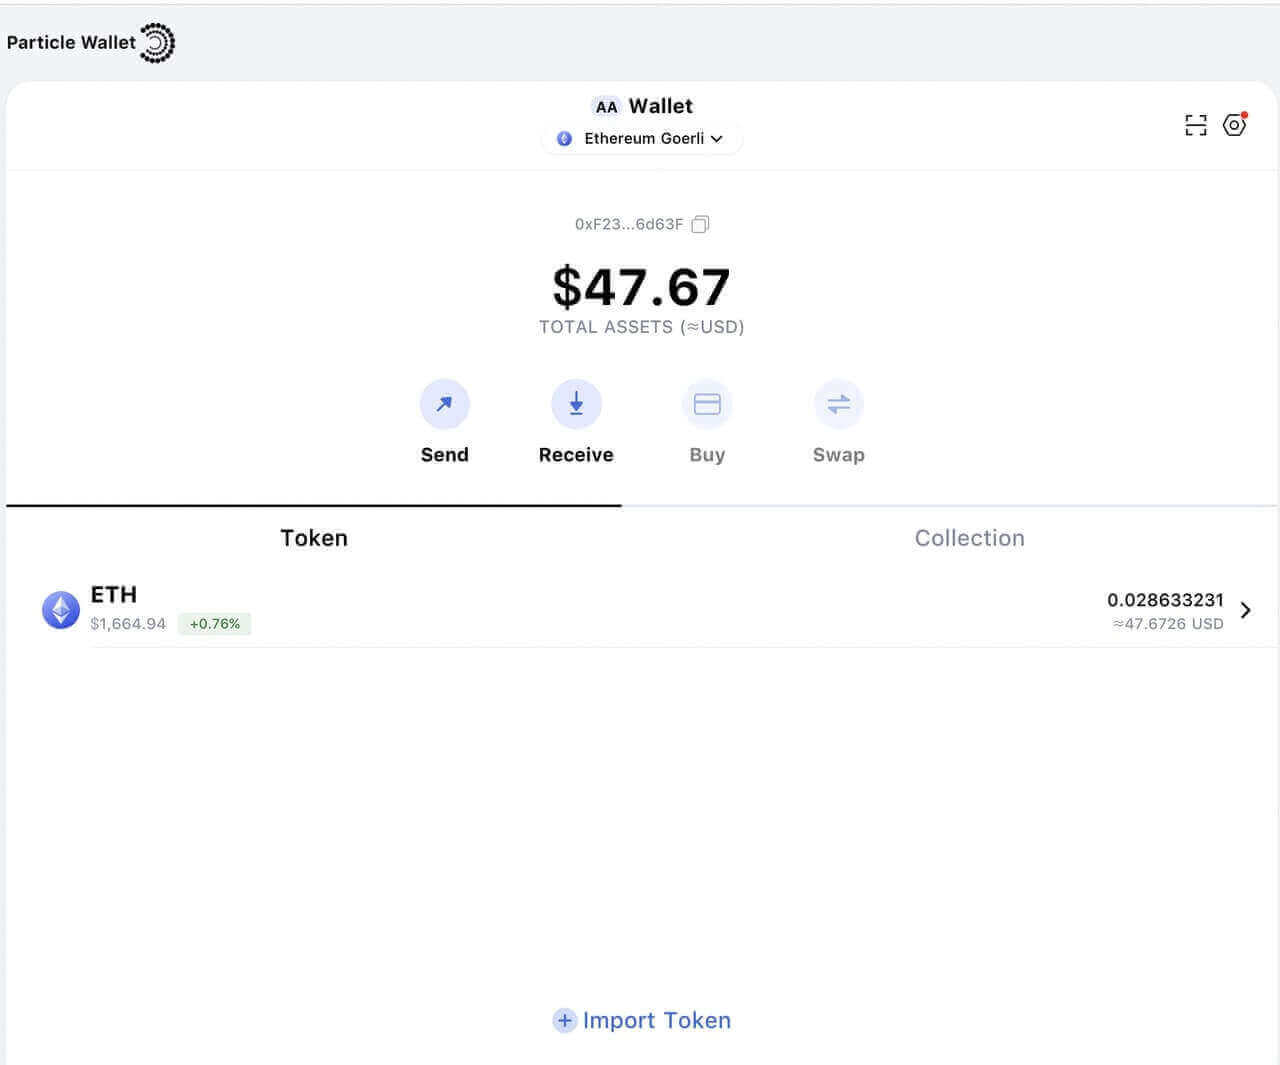
2. Manage wallet on App:
- App: This is what the same process looks like on theApp.
